RockingJavaBean's Blog

Drink the coffee, write the code


  • Home

  • Archives

spring boot 中实现策略模式

Posted on 2021-06-16

1. 简介

策略模式用于避免编写开发者在方法里使用大量的 If-Else 语句,将使用算法的责任和算法本身分割开来,委派给不同的对象管理,提升代码可读性以及可维护性。

structure

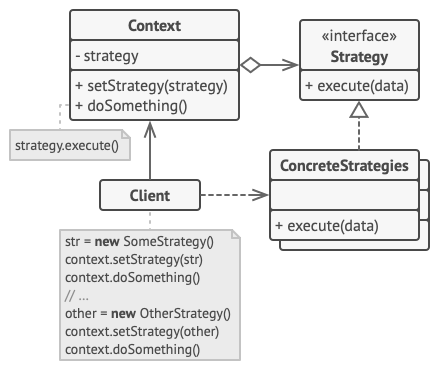
  • 上下文 (Context) 维护指向具体策略的引用, 且仅通过策略接口与该对象进行交流。
  • 策略 (Strategy) 接口是所有具体策略的通用接口, 它声明了一个上下文用于执行策略的方法。
  • 客户端 (Client) 会创建一个特定策略对象并将其传递给上下文。 上下文则会提供一个设置器以便客户端在运行时替换相关联的策略。
  • 当上下文需要运行算法时, 它会在其已连接的策略对象上调用执行方法。 上下文不清楚其所涉及的策略类型与算法的执行方式。

Spring 框架中使用策略模式

spring 中对于策略模式模式的实现,可以利用 spring 框架关于 Map 类型的自动装配特性。
以 refactoringguru 网站上的 Navigator 为实例,进行思路分析。
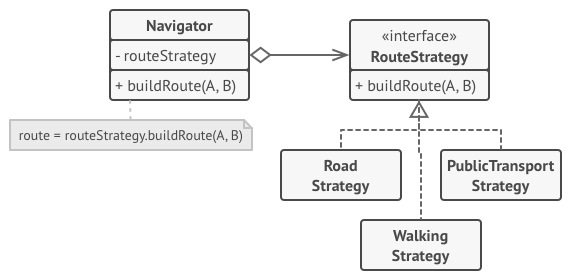
example

定义接口

1
2
3
public interface RoutingStrategy {
Route buildRoute();
}

RoadStrategy 实现类

1
2
3
4
5
6
@Component("RoadStrategy")
public class RoadStrategy implements RoutingStrategy {
public Route buildRoute() {
return new Route("road");
};
}

PublicTransportStrategy 实现类

1
2
3
4
5
6
@Component("PublicTransportStrategy")
public class PublicTransportStrategy implements RoutingStrategy {
public Route buildRoute() {
return new Route("PublicTransport");
};
}

WalkingStrategy 实现类

1
2
3
4
5
6
@Component("WalkingStrategy")
public class WalkingStrategy implements RoutingStrategy {
public Route buildRoute() {
return new Route("Walking");
};
}

每个实现类分别实现 RoutingStrategy 接口,并使用 @Component 注解将实现类注入到 spring 容器中。

RoutingController 使用 Map<String, RoutingStrategy> 获得 spring 容器中全部实现 RoutingStrategy 接口的实例。
此外,Map 中 key 的值对应上文使用 @Component 注入是为实现类设置的名称。

1
2
3
4
5
6
7
8
9
10
11
12
13
14
15
16
17
@RestController
@RequestMapping(value = "routing")
public class RoutingController {

private Map<String, RoutingStrategy> routingStrategies;

// 利用 spring 框架的 constructor 注入
public OrderController(Map<String, RoutingStrategy> routingStrategies) {
this.routingStrategies = routingStrategies;
}

@RequestMapping(value = "type")
@RespondBody
public Route getRouteByType(String type) {
return this.routingStrategies.get(type).buildRoute();
}
}

依据 Web API 传入的 type,在 routingStrategies 字典找到对应的策略实现类,并通过实现类中独立封装的算法逻辑,返回需要的 Route 对象。

spring 集合类型注入知识补充

spring 框架处理集合类型自动装配的源码位于 DefaultListableBeanFactory 类的 resolveMultipleBeans 方法。

1
2
3
4
5
6
7
8
9
10
11
12
13
14
15
16
17
18
19
20
21
22
23
24
25
26
27
28
29
30
31
32
33
34
35
36
37
38
39
40
41
42
43
44
45
46
47
48
49
50
51
52
53
54
55
56
57
58
59
60
61
62
63
64
65
66
67
68
69
70
71
72
73
74
75
@Nullable
private Object resolveMultipleBeans(DependencyDescriptor descriptor, @Nullable String beanName,
@Nullable Set<String> autowiredBeanNames, @Nullable TypeConverter typeConverter) {

Class<?> type = descriptor.getDependencyType();
if (type.isArray()) {
Class<?> componentType = type.getComponentType();
ResolvableType resolvableType = descriptor.getResolvableType();
Class<?> resolvedArrayType = resolvableType.resolve();
if (resolvedArrayType != null && resolvedArrayType != type) {
type = resolvedArrayType;
componentType = resolvableType.getComponentType().resolve();
}
if (componentType == null) {
return null;
}
Map<String, Object> matchingBeans = findAutowireCandidates(beanName, componentType,
new MultiElementDescriptor(descriptor));
if (matchingBeans.isEmpty()) {
return null;
}
if (autowiredBeanNames != null) {
autowiredBeanNames.addAll(matchingBeans.keySet());
}
TypeConverter converter = (typeConverter != null ? typeConverter : getTypeConverter());
Object result = converter.convertIfNecessary(matchingBeans.values(), type);
if (getDependencyComparator() != null && result instanceof Object[]) {
Arrays.sort((Object[]) result, adaptDependencyComparator(matchingBeans));
}
return result;
}
else if (Collection.class.isAssignableFrom(type) && type.isInterface()) {
Class<?> elementType = descriptor.getResolvableType().asCollection().resolveGeneric();
if (elementType == null) {
return null;
}
Map<String, Object> matchingBeans = findAutowireCandidates(beanName, elementType,
new MultiElementDescriptor(descriptor));
if (matchingBeans.isEmpty()) {
return null;
}
if (autowiredBeanNames != null) {
autowiredBeanNames.addAll(matchingBeans.keySet());
}
TypeConverter converter = (typeConverter != null ? typeConverter : getTypeConverter());
Object result = converter.convertIfNecessary(matchingBeans.values(), type);
if (getDependencyComparator() != null && result instanceof List) {
Collections.sort((List<?>) result, adaptDependencyComparator(matchingBeans));
}
return result;
}
else if (Map.class == type) {
ResolvableType mapType = descriptor.getResolvableType().asMap();
Class<?> keyType = mapType.resolveGeneric(0);
if (String.class != keyType) {
return null;
}
Class<?> valueType = mapType.resolveGeneric(1);
if (valueType == null) {
return null;
}
Map<String, Object> matchingBeans = findAutowireCandidates(beanName, valueType,
new MultiElementDescriptor(descriptor));
if (matchingBeans.isEmpty()) {
return null;
}
if (autowiredBeanNames != null) {
autowiredBeanNames.addAll(matchingBeans.keySet());
}
return matchingBeans;
}
else {
return null;
}
}

1. if (type.isArray()) 分支
如果需要装配的对象类型为数组,通过 findAutowireCandidates 方法在 Spring IOC 容器中找到与数组成员类型匹配的 bean。
并将找到的 bean 放置在数组中,返回给装配对象。

1
@Autowired RoutingStrategy[] routingStrategies;

routingStrategies 的成员为 RoadStrategy, PublicTransportStrategy, WalkingStrategy。

2. Collection.class.isAssignableFrom(type) && type.isInterface() 分支

1
@Autowired List<RoutingStrategy> routingStrategies;

与数组处理逻辑类似,处理 Java 集合的装配对象,但是要求集合中成员的类型为接口。

3. Map.class == type 分支

对应上文 Map<String, RoutingStrategy> routingStrategies 自动装载。Spring 会将 bean 名称设置为 key,并将 bean 的引用设置为对应的 value。

Reference:

  • https://refactoringguru.cn/design-patterns/strategy
  • https://spring.io/
  • https://www.baeldung.com/spring-injecting-collections

个人博客:Hexo + Github Pages + travis

Posted on 2020-06-01

记录一下使用 Hexo, Github pages 和 Travis 搭建个人博客的过程。

目前实现的效果是,本地使用 Markdown 编写博客文章,travis 自动基于仓库源码,构建静态资源,完成网站部署。
以上均为免费服务,无需花钱租用虚拟主机。

1. Github Pages

Github Pages 是 Github 提供的静态页面服务,依据其官网,使用的方式比较简单。
大体的 Gist 就是

  1. 创建名称为 username.github.io 的代码仓库
  2. 将 Web 静态资源通过 Git push 到 username.github.io

其中 username 为具体用户登录 Github 网站的账号名称,当浏览器访问 https://username.github.io 时,仓库 master 目录下的静态资源就会被加载。

Branch Description
develop 开发分支,管理 Markdown 源码与项目配置文件
master 存储基于 develop 分支源码生成的静态资源文件

2. 流程

  1. Hexo 用于将 Markdown 编写的博客文章源文件生成为静态页面
  2. Github pages serve 生成的静态文件,在公网上提供访问接口
  3. travis 由 develop 分支的新 commit 触发,执行 hexo generate 命令生成静态文件,并将生成的内容 push 到 master 分支

3. Hexo

A fast, simple & powerful blog framework.

安装命令行工具

1
npm install hexo-cli -g

Hexo 的常用命令

创建新文章

1
hexo new "My New Post"

本地服务器

1
hexo server

生成静态页面

1
hexo generate

部署

1
hexo deploy

4. Travis

A hosted continuous integration service used to build and test software projects hosted at GitHub

Travis 为 Github 的公开仓库提供免费的构建服务。

整合 Github

  1. https://github.com/marketplace/travis-ci 添加 Travis App.
  2. https://github.com/settings/installations 为 Travis 添加访问 Github 公开仓库的权限
  3. 打开 https://github.com/settings/tokens 生成 Token 供 Travis 使用

.travis.yml

完成整合后,在项目根目录下添加 .travis.yml 配置文件。

1
2
3
4
5
6
7
8
9
10
11
12
13
14
15
16
17
18
19
sudo: false
language: node_js
node_js:
- 10
cache: npm
branches:
only:
- develop
script:
- hexo generate # generate static files
deploy:
provider: pages
skip-cleanup: true
github-token: $GH_TOKEN
keep-history: true
target_branch: master
on:
branch: develop
local-dir: public
  • github-token: 需要在 travis 中添加 GH_TOKEN 环境变量,环境变量的值为之前生成的 token
  • develop 分支用于管理博客 markdown 内容,hexo 配置文件
  • target_branch: master 指定 travis 将 hexo generate 生成的静态资源文件 push 到 master 分支

5. Summary

详细配置请参考 repo,博客访问地址为 rockingjavabean.github.io。

以上
RockingJavaBean

RockingJavaBean

2 posts
2 tags
© 2021 RockingJavaBean
Powered by Hexo
|
Theme — NexT.Muse v6.0.0